 | |
Home >> Articles >> Technology
 Myden's Guide To Building One Of The Best Home Theatre Screens On The Planet
October 2, 2006
Why I wrote this guide
For certain things in life, I really try to make sure I'm doing it the best way possible. I'll research for hours, until I'm positive
I'm doing it the best way possible, and seek advice from the most knowledgable people I can find. Building a home theatre screen was
one of those things that just had to be done right.
It was clear to me early on that the folks in the "do-it-yourself screen section" of AVSForum.com
were by far the most advanced DIY screen builders I could find. In particular, a soul who goes by the nickname of MississippiMan seems
to be the expert in this field.
He offered me a *tremendous* amount of advice, and most of the credit for this guide should go to him. After compiling advice and tips
from around the Internet, and from MississipiMan, I created a theatre screen, that allegedly should rival, if not surpass, the most expensive ($3000+)
screens that money can buy.
Advice like this shouldn't just fall to the wayside, and if you're looking to build your own screen, but don't know where to begin, this
guide can save you countless hours of work.
First Step: What to use for the screen?
The best material you can use is called Sintra board. It's often used by companies for outdoor advertising (signs, billboards, etc).
It's light, yet strong (won't warp), and very smooth (which is key, when building a great screen).
Now, you can't just find Sintra board anywhere, you probably won't find it at Home Depot or regular building suppliers. I had to
call a few plastic suppliers, and that was after e-mailing a few local advertising companies, and asking where they bought their
Sintra board.
You'll want white sintra board, as thin as you can acquire it (I believe the thinnest is 1/4 inch). How big? Well how
big do you want your screen to be?
Ok, so how big *should* my screen be?
Good question. You should think long and hard about your screen size. Measure the distance from the wall, to where
you'll be sitting. Let's say it's 12 feet. That's 144 inches. Now, to figure out an ideal screen WIDTH, you should
divide that number by 1.75, which would be 82 inches.
Distance to wall from the couch / 1.75 = Ideal Screen WIDTH
Now this number isn't set in stone, you can divide the distance by 2, and that's the smallest screen width you should aim for.
Divide the distance by 1.5, and that's the largest screen width you should aim for.
So in my example, from a seating distance of 144 inches, the maximum width your screen should be is 96 inches. The smallest is 72 inches.
And somewhere in the middle is "ideal".
Now, in home theatre world, bigger is usually better, but the choice is yours.
Ok, I've got an idea of how WIDE my screen should be, so what are the dimensions of my screen?
Well, you have to decide what kind of screen you want. Personally, unless you have good reason, you should stick to the 16:9 format.
That's what today's DVDs use, and that's what tomorrow's high-definition television will be broadcast in. 16:9 is the "rectangle" shape, that
all the new TVs use.
So, if we take 16, and divide it by 9, we get 1.77777 (repeating forever). Let's say you've decided (after thinking long and hard) that
you're aiming for a screen width of 82 inches. To get the screen HEIGHT, we simply take 82 and divide it by 1.77, or 46.5 inches.
Screen Width / 1.77 = Screen Height
and for the mathematically challenged....
Screen Height * 1.77 = Screen Width
These calculations are for 16:9 screens only of course, the rectangle ones.
Ok, I've figured out the dimensions, now I know what size Sintra board to get!
Not so fast. Have you thought about a border? Great screens need a black border around the edge. You'll want one that's either 2 or 3 inches.
If you want a 2 inch border, you'll need to add 4 inches to your width dimension, and 4 inches to your height dimension.
Alright, after triple-checking, I think I finally have my dimensions right...
Well now you can try and track down the right size Sintra board. One thing to note: It's very hard to find pieces of ANY type of board
bigger than 5x10, which is 60" x 120". Mind you, that's one heckuva large screen, but not big enough for some people lucky to have a lot
of space.
I had my Sintra board laser cut by the plastic supplier I purchased it from. Try and get them to cut it as precise as possible, based
on your calculations.
Got the Sintra board, now what?
Actually white Sintra board by itself is a damn fine screen. But we can do better....much better. We're going to paint our Sintra
board with a product called Screen Goo.
This product has been thoroughly tested by the DIY screen community, and the results are impressive, to say the least. It's not exactly
cheap ($200), but man does it deliver results. A "Goo Screen" ends up looking as good as the most expensive screens around, and that's
not marketing hype, but based on independent results reported by do-it-yourselfers over at the AVSForum.
Which Screen Goo Do I Need?
Use the Goo Systems calculator to figure out which type of Screen Goo,
and how much of it, that you need.
Ok, then what, roll it on?
For the absolute best results, you absolutely can not, should not, roll the Screen Goo. In fact, much of this guide is going to revolve
around tips for spraying. Spraying is the only way to build a great screen, the texture of the screen will be better by leaps and bounds, and thus,
so will be the quality of your projected picture.
This is where MississippiMan's help is needed
Let me start by saying that spraying is definitely a skill. Let me also say that prior to building my screen I had never touched a
paint spray gun in my life, nor did I know a thing about them. Finally, let me say that using the tips that I collected, and
MississippiMan's advice, I was able to do a wonderful job of spraying my Goo Screen.
Get a HVLP gun, not a crappy $50 paint sprayer from Home Depot
HVLP (high volume, low pressure) guns are the *only* way you should consider spraying your screen. HVLP guns are amazing. For our
purposes you'll want one that has a 1.5mm tip. I did some research, and the HVLP guns by a company called Astro are phenomenal
for the price.
I'd recommend grabbing the QUL105 model
from either SprayGunWorld or eBay
or somewhere on Google.
SprayGunWorld sells it with the regulator (the little thing in the picture right below the spray gun), that allows you to control
your pressure, and shows what pressure you're using at the gun, both of which are very handy.
You should also grab a pack of those blue filters that are at the bottom of the SprayGunWorld page.
The compressor tank
Unfortunately your 5 gallon electric compressor that you use to run a nail gun won't be nearly enough to adequately use an HVLP gun.
You need a *big* compressor, gas powered, with at least a 10 gallon tank, preferably more. If you're using the gun I recommended above,
you're looking for one that can pump out greater than 10 CFM. If you don't know what that a CFM means, talk to the people at the place
where you'll inevitably have to rent one from!
If you don't get a powerful enough compressor, you won't be able to do a good job with your HVLP sprayer.
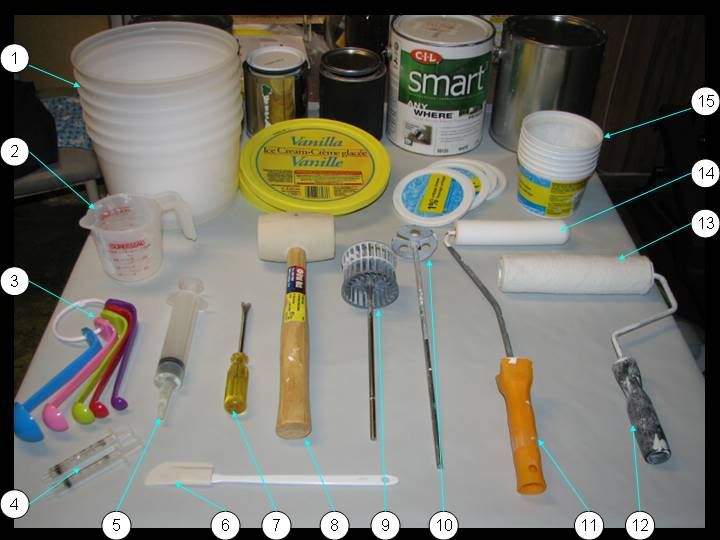
What else do I need?
- A couple of clean 1-gallon paint buckets (you can buy them at Benjamin Moore or Home Depot)
- 1 gallon "Sock Type" Strainer. Looks like something you'd use for a Conehead halloween costume. (Home Depot or Benjamin Moore)
- Pouring spout lid. It attaches to your 1 gallon paint containers. (Home Depot)
- Distilled Water. Make sure the container explicitly says "distilled". Not "purified" or something else. (Grocery Store)
- "Squirrel Cage" type Hand Drill mixing tool. This wonderful device attaches to your drill, to help mix your paint, nothing else works as well.
It looks like Tool #9 in this picture. (Home Depot)
- Large pieces of scrap, to practice spray painting
- Roll of plastic sheeting. (Home Depot)
- Respirator. Very important. Get one rated for spray painting latex paints. Don't just use one of those white masks, you need the real
deal. The chemicals in paints cause cancer and other dangerous side effects, get a respirator, and don't cheap out, should cost you at
least 40 bucks. (Home Depot)
- Clean white cotton cloth, damp, but not soaking wet.
- A way to mount your screen. I bought some long skinny pieces of wood, about 3/4" thick, and attached my screen with 6 screws. Then
I took another one of those skinny pieces of wood, and screwed it into the wall in my garage. (After putting plastic sheets behind
it of course).
The screws were placed within the top 2 inches of the Sintra board, where a border would eventually cover them.
I then simply rested the wood attached to the back of the screen, on top of the piece of wood mounted in my garage. I did the same
thing when I went to mount the screen in my theatre.
Some people make "cleat" systems to make it more stable, but I didn't bother.
Anything else?
During my e-mails with MississippiMan, he mentioned that there were a few things I could add to my Screen Goo Top Coat to improve the picture even
more.
I should mention that MississippiMan is an expert when it comes to DIY screen paint mixtures, and even developed his own screen paint
formula, much like Screen Goo.
It's up for debate whether MississippiMan's formula is better than Goo's, but suffice to say, his is a LOT cheaper, and can be made
with paints available at your local Home Depot.
I haven't tried his screen paint combo, but many others have, and it sounds amazing, much like Screen Goo. If I hadn't already
purchased my Screen Goo, I definitely would have given MississippiMan's formula a shot.
MississippiMan's formula has evolved, and seems to go by the name of "RS-MaxxMudd" now. You can learn about it in threads like this
over at AVSForum.
Now, according to MississipppiMan, because I was using Digital Grey Lite Screen Goo, in a light controlled room, the following 3 ingredients
should be added to my Goo Top Coat, which was of the 1 litre size:
8 Oz. of Minwax PolyAcrylic (water based) Clear Satin (Home Depot)
8 Oz Delta CeramCoat Silver Metallic (8 oz bottle) (available at Michaels)
8 Oz Delta CeramCoat White Pearl (8 oz bottle) (available at Michaels)
So I should add these 3 things to my Goo Top Coat?
If your set-up seems a lot like mine, you should consider it. Meaning that...
- You're using Digital Grey Lite Screen Goo, 1 litre size.
- You have a dark room, completely light controlled environment
According to MississippiMan, I should have ditched the Screen Goo altogether, and gone for something he called "Black Flame" or at the very
least RS-MaxxMudd FS (full strength)
But, he admitted that Screen Goo is very good, and if I added the 3 ingredients he recommended, I would be very pleased. You may want
to ask the folks over at AVS Forum what they would recommend for your particular room, amount of light, type of projector, etc.
Preparation:
HVLP gun, check. Compressor, check. Now what?
If you rented the compressor, drain it out completely, and leave it overnight, if you can. Condensation can build up if there is a big
temperature change, and you don't want that shooting out while you're spraying.
- Read the manual for your HVLP gun, learn how to use it. Here's a great PDF file on proper HVLP Spray Technique.
- Perform a dry run, with pressure flowing through the gun, moving as in practice at the speed and position required,
- Make at least 4 passes Right to left and back. (8 rows) Check your Compressor's "Tank" valve. If you're using 40 psi at the Gun, and
75 psi at the Hose Outlet Valve, you do NOT want to let the Tank's pressure level to fall below the Hose Outlet pressure.
- Keeping the pressure high keeps paint flowing through the gun consistently enough that the only reason foe "heavy or light" areas
will/would be your own erratic technique, not an equipment malfunction or weakness.
- Filter your paint using the 1 gallon "Sock Type" Strainer into a clean separate bucket with pouring spout lid (...you'll be glad you did!)
This filtration should suffice for quite a time unless you leave the top open and get a coagulation skim.
- Thin your Goo BaseCoat with distilled or purified water. Do so about 4 oz at a time into the Base Coat, and mix it well using the "Squirrel Cage"
type Hand Drill mixing tool.
- You're trying to get the paint thin enough so that when you lift the mixing tool out of the paint, it "pours' off the tool, and the
"Statted Vanes" clear of paint completely in approx 10 seconds.
- Gun adjustments must be made when you think you have achieved that level of viscosity. You'll know it...., for the paint will just
FLOW out the nozzle and leave a most definite swath on the surface, very defined from top to bottom.
- If the sprayed pattern looks noticably heavier in the center, and lighter at the edges, thin a little more. Don't exceed 20% total
water mixed into your Goo however, and remember, the thinner the paint, the faster you go across the surface.
Gun Settings:
- Open the air valve (bottom of handle) all the way, then close a 1/4 turn.
- Depress the Trigger, then turn the Fluid Knob (Rear of Gun-top-) inward until you feel pressure against your hand from the trigger
starting to lift.
- Pattern Control Knob (Left Side) This adjustment is done with the Gun "Loaded" and with pressure. Adjust Knob rearward to stop,
then forward 1 - 1/2 turn until pattern presented at 9" -10' from material shows a 8" vertical pattern that is very even as far as
coverage. Not too wispy at the top and bottom.
- Check out this image for an idea of the spray pattern you're going for.
Spray Technique:
- I suggest that you use a can of cheapo latex to experiment with at adding water to get viscosity right, get you familiar with the Gun's
settings down pat, and to practice your application skills.
An extra $15.00 or so investment might serve to assure you the greatest potential for complete success with a very costly and limited
supply of paint.
- Number one rule, don't "sweep" by moving your wrist. The tip of the spray gun should maintain a constant 90 degree angle with the screen, don't bend
your wrist at all. Pretend you're a machine in a factory.
- Second rule: The tip of your gun should be a constant 8 inches from the Sintra board as you move across it.
- Watch the videos below for examples of proper technique.
- "Shuffle and move" (see videos below). Maintain a precise height across the board, precise distance from the surface, precise speed across the surface
and don't you EVER start a row without having the intention of finishing it.
- I had trouble keeping the speed of my strokes constant. I finally started counting seconds when I started a stroke and tried to
emulate roughly the same position per count on successive strokes. This seemed to help me keep an even coverage.
- Overlap by 50% on the return route, maintaining the pace until you know how low your pressure has bled off to.
- Take your time. Nothing will make a mess faster than hurrying through coat and trying to go back and touch up missed and not
well covered spots.
- The thinner the paint, the smoother the resulting finish coat will be, but also the faster you must move across the surface.
- It helps to look at your 'strokes' from the side and get a 'wet reflection' rather than a 'color reflection' from the front. Especially
if you are spraying thin coats of the same color.
- Keep the air hose behind you at all times.
The Base Coat:
- Thin the Goo Base with just enough water to make it thin enough to flow through the spray nozzle easily. Start with 4 oz. of water added,
and throughly mixed with a good mixer tool (Squirrel Cage type) and check using the "pour" test I've described previously (vanes clear in 10 seconds).
- Do not thin the base coat by more than 20%. So, if you've got 1000ml of Base Coat, add 8 Oz (240ml) at most.
Set the Gun for a 6" to 8" pattern when spraying from 8" distance.
- Apply the first coat of base as a "duster" by dusting on the paint by rapidly moving across the surface at 2' per second.
- Apply the 1st "real" coat & 2nd real coat at 1' per second.
- When doing the first "Duster" coat, by the time you reach the bottom, you can often repeat the process again starting again from the
top. But ONLY if you managed to get the first coat down evenly and thinly enough to allow for it to become slightly dry in the time it
took you to do the entire surface.
If you ripped right though it, then just wait at least 5 minutes after reaching the bottom, then go back again at the same speed, or
just slightly faster.
- On the second coat, use the same speed & distance ratios, but perhaps just a little slower, but with 50% overlap.
- If you do lay the paint down at a slower rate, do NOT go back over it again after finishing at the bottom.
If you went slower, and overlapped correctly, then once again, you just wait for the surface to lose all
hint of a wet sheen, then if you want to do an 'evening' coat, do that once again at the faster speed w/50% overlap.
- After the second coat, it's wisest to let that one dry as long as you can stand it. 2 hours is good, 3 hours is better.
- At 100" diagonal, you should have enough to cover your surface with at least 2 really complete coats + the initial "Duster".
- I never realized this until later, but the Base Coat is more important than the Top Coat. The Top Coat is a translucent paint, so
don't go thinking you can get away with a poor job, and then make up for it later.
- Stripes are going to appear, don't stress over them, second or third coats will blend them in. Especially don't go back and try
to fill them in when the coat is not dry.
- Far better to apply a thin even coat that drys all the more faster for a subsequent following coat to go on top, than to have a bunch
of runs develop. But.....should that happen, if you have a clean, white cotton cloth, moistened to "dampness" (not dripping) with water,
you can blot out any mistake by lightly dabbing the area (...do not wipe) and then "sweep dusting" that spot after it has had time to
set up and dry a bit.
The Top Coat:
- Add 8 Oz. of Minwax PolyAcrylic (water based) Clear Matte Finish
Add 8 Oz Delta CeramCoat Silver Metallic (8 oz bottle)
Add 8 Oz Delta CeramCoat White Pearl (8 oz bottle)
- Stir with mixer, do the "Pour" test, add only enough water to reach the desired viscosity. Your Goo Top Coat should be bumped up to
almost 2 US quarts, so there should be no worrying now about having enough.
- *Important*: Applying the Top Coat is almost the same as the base coat, except it is a more translucent paint, and a little thinner already, so you
will need less water. I only had to add 4 to 6 Oz of distilled water to my 1000ml of Top Coat (plus the 3 extra ingredients).
- The top coat does not need nearly as much thinning as the base coat.
- Trouble yourself to load the Gun up and spray a test area to determine the correct gun settings, and how well the paint is laying down.
Let the test area dry and check for any excessive "gloss" If gloss is apparent after the surface is completely dry to the touch,
add 8 Oz more Minwax matte.
- In spraying on the Top Coat, once again, speed and overlap remain the most important factors. You should move about as fast as the
fastest representation on video that I've sent. At that speed, overlapping 50% will assure you of even coverage, and you will economize
on paint usage per coat.
It's better to lay down 3-4 very thin and quickly applied coats than two heavy ones that wind up showing "stripes" when the PJ's light
hits the screen.
- Clean the gun between each coat. If you misjudge the viscosity and upon application, see the paint going on too thin or you are unable
to get a good, even pattern, then dump the paint back in with the rest, "CLEAN THE GUN" then add more water, and re-try again.
Far better to take the time to get it right than to proceed on hoping the coverage will even out. Nope, when the paint isn't thin
enough, it just keeps getting worse at spraying out in the amount needed for quick and even coverage.
- Expect the finished surface to look very "sheeny" when wet. If you did a good even job of consistently applying the same amount with
each pass, and overlapped evenly by 50%, when you stand to the directly to side of the screen the entire surface should look evenly
covered and glossy wet, but when dry, it should most definitely look to have a Flat Finish.
- Wait as long as you can in between coats. Goo Systems recommends at least 1 hour, but try for 2 or 3 if you can.
Corrections:
- Corrections are made by going at least 1/2 again faster over the area, and not at all if you found that you've left the
surface "Shiny wet" after your first pass.
General Tips:
- If you use an HVLP unit with it's own blower place the intake away from your work. It kind of stirs up dust that you don't want
getting in the paint.
- Keep a piece of scrap handy to adjust the rate of spray from your gun before you put it to the screen.
- If you need to start a stroke in an area other than outside the painting area, start moving your gun along the stroke direction
before you pull the trigger, this helps you keep from over spraying the starting spot.
- Read the instruction manual for your painter! I'm one of those guys who gets a new toy and likes to rip the box apart and dive into
it before I even consider the instructions. Particularly take note to spray an even distance from the material and not to "sweep".
After it's over
- Goo paint dries after 4-5 hours, but takes 4-6 weeks to completely cure, yes, 4-6 weeks! Any mistakes that you made will likely
dissapear as the Goo cures.
- A great way to add the border is to use the Goo Systems Screen Flok, which
is essentially black velvet tape. It's a little expensive, but easy to apply, and works perfectly. It comes in 2 inch and 3 inch versions,
shop around for it on Google. There's a store on eBay that sells it a little cheaper.
- Hopefully your screen looks amazing. And if you think it looks amazing now, wait a few weeks, it will look even better!
Videos showing proper spray technique
Video 1 (8 megs)
Video 2 (6 megs)
Video 3 (4 megs)
Video 4 (4 megs)
Video 5 (9 megs)
Video 6 (6 megs)
Video 7 (7 megs)
Video 8 (5 megs)
Links I found useful
Sylvain Duford's Integration Blog : New projection screen paint
Buying a Screen? Go for the Goo
Project Screen Goo
How To Apply Screen Flok
DIY Screen Forums @ AVSForum
Excel Spreadsheet For Calculating Everything About Your Home Theatre
|
|
| |


